Tethered Shooting
Tethered shooting, or wired or remote shooting, generally refers to controlling a camera using a computer, laptop, or even a smartphone.
Tethered Shooting at the OST
The CCDs used at the OST are all tethered remotely. The programs used for this are Maxim DL or CCDOPS, the use of which is not the subject of this article. This article focuses on the use of a digital or compact camera and is therefore also applicable outside the astronomical field.
Technical requirements
Remote shooting is not always straightforward. First of all, it should be noted that not every camera supports tethered shooting. This can be found out e.g. at the manufacturer. Alternatively, the software described here offers a query that shows whether and which functions are supported.
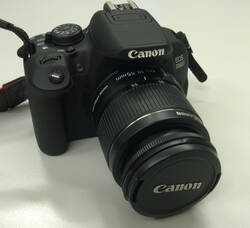
The Canon EOS 700D currently used in the lab course supports all relevant functions.
Of course, a computer is required for control. The software presented here is available in the standard package sources of all common Linux distributions.
The right software
The basic requirement is a driver package that supports the camera used. The vast majority of programs for controlling cameras use the libraries of gphoto2.
gphoto2
gphoto2 is the basis for virtually any remote control of a camera using a computer. The installation is done via a package manager of your choice or directly from the command line via
sudo apt-get install gphoto2
Besides an enormously extensive driver database, it also offers first basic functions like transferring images to or from the camera, as well as commands for shooting single or even continuous images.
gphoto works completely on the command line. Besides the fact that this is difficult to handle for some users, there is also a lack of possibilities to view the shots directly as well as a live preview function. For this purpose, another software can be installed that provides a graphical interface.
Entangle and others
To use the functions provided by gphoto2 more comfortably, a graphical user interface should be used. The editorial recommendation is Entangle, whose functionality is sufficient for operation at the OST. The installation is done via
sudo apt-get install entangle
The much more comprehensive software solution is Darktable. It offers far more functions, but these are mainly used in the field of professional photography. For astronomical purposes these are mostly not helpful. Moreover, the large range of functions comes at the expense of clarity. Especially when used in combination with a laptop that only has a smaller screen, the very extensive Darktable quickly causes confusion.
On the use of gphot2 and Entangle
This section is dedicated to the preparation and use of the camera remote control on the OST. It makes no difference whether the camera is attached to a telescope or used with the associated lens. In principle, the camera can be operated with automatic settings for exposure, focus, etc. In astronomical use, however, manual configuration is usually useful, if not necessary. Therefore, it is assumed in the following that the camera is operated in manual mode. For this, the menu wheel is turned to M. The following settings can now be set manually
- Exposure time
- White balance
- ISO correction
- Aperture opening
These are also the parameters that will later be controlled via Entangle. Focus and focal length are controlled separately via the lens and are not affected by the manual mode. The focal length must be controlled manually under all circumstances, but the autofocus can be turned on and off. When used together with the telescope, these points are of course not relevant, since no lens is used there and the telescope replaces the lens.
If the necessary programs have been installed on the computer, the camera is connected in a switched-off state and then switched on. The camera should now be recognized as a mass storage medium by the computer. If this is not the case, the appropriate driver software is probably not present. This can have two reasons
- The specific camera is not supported by the driver package, or
- Problems occurred during the installation of gphoto2. A reinstallation of the software might help.
The following steps are optional and do not have to be repeated every time you connect the camera. The connected camera can be controlled with
gphoto2 --auto-detect
to identify the camera. The output should look like this
Model                          Port
----------------------------------------------------------
Canon EOS 700D                 usb:001,008
You can find out which functions the camera supports with
gphoto2 --port usb: --abilities
which leads to the following result for the Canon in the lab course:
Abilities for camera             : Canon EOS 700D
Serial port support              : no
USB support                      : yes
Capture choices                  :
                                 : Image
                                 : Preview
                                 : Trigger Capture
Configuration support            : yes
Delete selected files on camera  : yes
Delete all files on camera       : no
File preview (thumbnail) support : yes
File upload support              : yes
Here you can see that the camera supports the functions we want: Capture image, image download and upload to the camera, as well as live preview. A image can be captured with
gphoto2 --port usb: --capture-image-and-download
and automatically downloaded from the camera. Attention: this will delete the image on the camera. It should also be noted that the camera will transfer the JPEG and/or raw image depending on the setting. This setting can also be adjusted using the remote control. A mode that has less relevance on the OST is the actual tethered mode into which the camera can be switched via
gphoto2 --port usb: --capture-tethered
Here the computer waits for a trigger event at the camera. That means the camera is used as usual, a picture is taken by pressing the shutter button, only now the picture is automatically transferred to the computer. There are other possibilities to access the camera directly via gphoto2. But these are not of interest here. Please refer to an external reference like this nice list in the Ubunutu wiki.
Entangle is now started for the actual work.
 To establish a connection, the item Connect can be found in the Camera menu. A small window will now show a list of all available cameras. With a click on Connect the program should establish the connection.
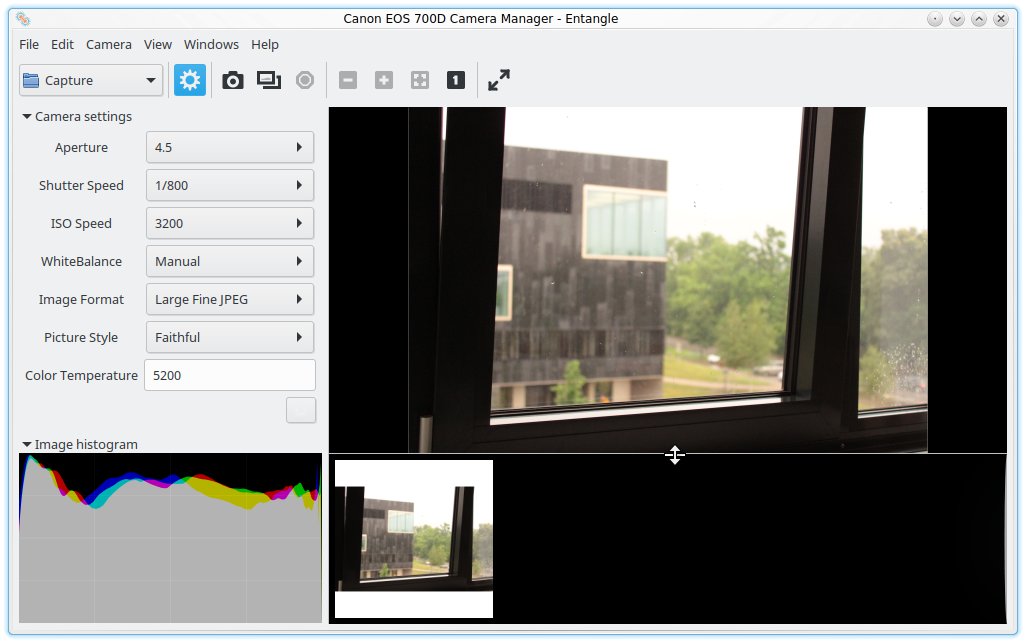
 Now the camera will be displayed with various settings:
 If the menu bar on the left is not displayed, a click on the blue highlighted gear wheel on the screenshot will help. On the left side, the most common setting options are now displayed collectively. This overview can be extended by clicking on the small gear wheel at the end. From the now much longer list, the desired elements can be selected. However, the important settings are already available at the beginning. Below the settings, a histogram is displayed according to the color channels as soon as an image is available or the live mode is active.
Back to the bar with the blue highlighted gear. From left to right you will find the following buttons there
- Folder icon + Capture: this is where the location of the images is set. By default, Entragle creates a folder Capture in the default image folder. However, any other directory can be selected. The naming scheme of the images can be changed under Edit → Preferences.
- Next to it is the already known button for showing and hiding the preferences bar.
- The small camera symbolizes the most important point, the shutter release. When clicked, a picture is created and saved in the selected folder. Now the large black areas of the program interface fill up. The large area on the right shows the current image, and the area below it shows a preview of all the captured images in the storage folder. An image selected there appears large in the upper area. The small area on the left now shows the histogram of the currently selected image.
- The double frame activates the live preview mode. The large area now shows a preview of the image, with any effects due to changed settings already visible. This mode is extremely helpful, especially when using the telescope. Focusing using the camera's small screen is impossible and zooming in every time a shot is taken and saved is very cumbersome. On the much larger computer screen this can be done much more conveniently. Caution: in live use, the camera is permanently in operation, which leads to enormous power consumption. So if the camera is to be used like this for a longer time (more than 10 minutes), at least an additional battery is needed, if not a power supply.
- The hexagon symbolizes a stop sign and is there to cancel running recordings.
- The next 4 buttons allow to enlarge the preview. The 1 sets the image to the original pixel size, whereby the actual image normally becomes much larger than the screen. The + and - can then be used to select different magnifications. The remaining button resets the image to the window size.
- The last button with the two arrows puts the program window into full screen mode.

