Controlling the CCDs with CCDOPS
Preparations
Mounting and connecting to the computer
The CCDs can be controlled by the computer with the software CCDOPS. The program is linked to the desktop and can by starting by clicking the CCDOPS symbol.
Once the program started, you need to open the menu to establish a connection with the camera. Click on the following menu buttons:
Camera -> Establish COM Link
If the connection has been established successfully, details on the camera will be displayed at the lower right part of the window (see below), such as the type of the camera, the resolution, the temperature (incl. the utilization of the cooling in per cent), and the filter (if used).
Setting the temperature
To reduce the thermal noise of the exposures, the CCDs can be cooled up to 30 K below the ambient temperature by a peltier element. To get to the settings for the cooling, open the setup menu with:
Camera -> Setup
In the popup window (see figures below), choose Active for the drop down menu that is labeled with Temperature Regulation. Subsequently, set the temperature to which the CCD shall be cooled in the field Setpoint. As stated before, the CCD can be cooled up to 30 K below the ambient temperature. However, note that the cooling device should not run at full power (100% in the cooling control) for a long time. Therefore, a lower temperature difference between the ambient temperature and the CCD temperature might be more appropriated in some cases.


Binning
The cameras are able to bin several physical pixel to larger “image pixel”. This option can be very helpful to increase the signal to noise level of faint objects, especially at bad seeing conditions. The binning can be found in the camera setup at:
Camera -> Setup
For a 3×3 binning, set the Resolution Mode to 3xN and write a 3 in the field Vertical N Binning. The camera will then rebin 9 pixels to one pixel.
Focusing
To focus the CCD cameras, use the function Focus in the Camera menu:
Camera -> Focus
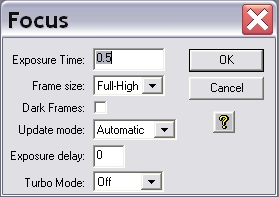
The settings should be similar to the ones depicted in the left image. With this function a exposure series (exposure time as set, 0.5 seconds) is taken and displayed. Now roughly focus with the focus knob at the telescope. It's recommend to point the telescope to a bright star and to focus until the diffraction ring disappears. Afterwards, point the telescope to a dense open cluster or even better a globular cluster and use the fine focus unit to optimize the focus. Find more about focusing in this article.
Taking images
The Grab-Menu
The Grab menu offers possibility to take single exposures or exposure series. The menu can be reached by:
Camera -> Grab
The following popup window opens, where all required settings for the exposures can be given.
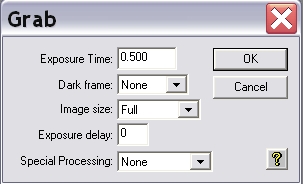
- set the exposure time in seconds in the Exposure Time field
- choose whether None or Only dark frames shall be taken by means of the Dark frame drop-down menu
- an exposure delay between the individual exposures can be set in Exposure delay
- for an exposure series, choose Auto Grab in Special Processing
Exposure series
For series of exposures, set Auto Grab in Special Processing. Click OK to get to the next window “Auto Grab Setup” (see below).
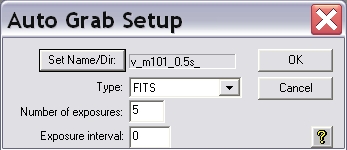 Set the number of exposures in Number of exposures in this window. In this example a series of 5 images is taken. It is important to set the directory where the FITS files shall be saved to in Set Name/Dir, along with the name pattern for the filenames (in this example “v_m101_0-5s_”). The filename should contain all important information on the exposure, here e.g. exposures of M101 in the V band with an exposure time of half a second. After the last given character the program will add sequential numbers for the individual exposures, so best use an underscore as a delimiter between the name pattern and the exposure ID. In the current example, the files would be named “v_m101_0.5s_1.fits”, “v_m101_0.5s_2.fits”, etc. After confirming the settings (click
 OK), the series will start.
IMPORTANT: There must be no dot in the filename pattern, otherwise CCDOPS (or more precise WINDOWS) will interpret the string after the dot as the file extension!
Filter
For each camera, we have a filter wheel with different filters. These can be both broad band and narrow band filters. The broad band filters (U, B, V, R, I) can e.g. be used to take RGB exposures of deep sky objects. The small band filters (Hα, Hβ, S II, O III) can be used to capture images of nebulae as these filters are (approx.) centered on nebular emission lines. The Hα-Filter can also be used to identify star-forming regions in galaxies. Detailed informations on the filters used in the different filter wheels can be found in this article.
Guiding
ST-7 and ST-8

Both the ST-7 and the ST-8 have an additional CCD (for tracking) besides the imaging CCD that is used for the science exposure. The tracking CCD can be used for the telescope guiding. The tracking CCD is mounted above the imaging CCD. Both CCDs can be used together in the Dualview option, which can be helpful in finding a suitable guide star. This mode can be activated via:
Camera -> Dualview
STF-8300
In contrast to the ST-7/ST-8, the STF-8300 does not possess an internal tracking CCD. The guiding with the STF-8300 takes place with the help of an off axis guider, which extracts a small portion of the light from the optical path by means of a small mirror. We use the ST-i as a guiding camera. The advantage of the off axis guider is that the guiding camera is placed in front of the filter wheel, so that the brightness of the guide star is not reduced by the individual filters. Therefore, fainter guide stars can be used with the STF-8300 than with the ST-7/ST-8. Similar to the ST-7/ST-8, the alignment of the ST-i CCD in relation to the STF-8300 CCD is such that the ST-i CCD is above the STF-8300 CCD in the CCDops illustration. The spacial distance between the CCD of the ST-i and the CCD of the STF-8300 is about 8'.
One has to start a second CCDops session by means of
File -> Launch 2nd CCDops...
to use the ST-i simultaneously with the STF-8300.
Guiding possibilities
In principal there are three different operation modes in which the the tracking CCDs can be used. In the Track and Accumulate mode, a number of exposures is quickly taken, aligned, and added up without active tracking of the telescope. In the Autoguide mode, the camera can be used as a separate auto guider, which is especially interesting for the STF-8300. The Self Guide mode allows simultaneous exposures of the imaging CCDs and an internal tracking CCD, which facilitates the tracking of the telescope. Thus, this mode is only useful for the ST-7 and the ST-8.
Preparations
The communication between camera and the mount happens by a separate cable [1], which needs to be installed prior to the observation.
ST-7/ST-8


The guider cable for the ST-7/ST-8 is equipped with a RC-7 plug, which must be connected with the free AO7 CFW8 SCOPE port of the camera [2]. Attention, the camera can take damage if the plug is plugged into its 12C AUX port! The other end of the cable (the RJ plug) must then be connected to the GUIDER port of the mount [3].
STF-8300


The guider cable for the STF-8300 has two modular connectors (RJ plugs) [4]. One of these plugs must be connected with the corresponding socket of the ST-i. The second one needs to be plugged into the GUIDER port of the mount [6], as it is the case for the ST-7/ST-8.
Calibration
Before the tracking function of the camera can be used, the connection to the telescope must be calibrated. For this purpose, select a guide star that is much brighter than the other stars in its field of view, so the program CCDOPS can clearly identify it. It is unimportant whether the star is on the imaging CCD or the tracking CCD. The calibration procedure works with both. Just take care that the star is approximately at the CCD's center. The calibration settings (see image below) can be found in this menu:
Track -> Calibrate...

Select the exposure time, the temporal shifts in X and Y direction, the current declination, the number of shifts, and the CCD chip. The exposure time should not be too short so the calibration star can clearly be identified by CCDOPS. The temporal shifts in X and Y direction should also not be to small to allow an exact calibration. The calibration star should move approximately 100 pixel in each direction during the calibration. The temporal shifts (in X and Y direction) can be split in several individual steps. This number can be set in Steps. In most cases, the value can remain at 1. By giving a declination one can use any star for the calibration. The results will then be scaled to the observational target, so that calibration is valid there. The following figure depicts the result of such a calibration. If the movements in +X and -X (+Y and -Y, too) are about equal a good calibration has been achieved. The axes in the lower right part of the image don't necessarily have to be horizontal and vertical to facilitate a good tracking.

Further tracking parameters can be set in:
Track -> Autoguide Parameters...
Active Relays denotes the directions that shall be tracked actively. The X Direction must be switched between Forward and Reverse, if the telescope crosses the meridian. In Aggressiveness one can damp or amplify the corrections CCDOPS gives to the telescope. The corrections are applied without damping at an Aggressiveness level of 10, while only 50% of the corrections are applied at a level of 5. The different Noise Filters can be helpful to achieve a successful tracking, if the guide star is relatively faint. If Log Tracking is activated, the corrections are recorded for further analyses. The X- and Y-Backlash can remain 0 for our mount. The settings Minimum move and Maximum move define the allowed correction ranges; they can be kept at their default values in most cases.

Self Guiding
The most common tracking mode for the ST-7 and ST-8 will likely be the self-guiding. Long exposures can be taken on the imaging CCD, while the tracking CCD is used for the guiding of the telescope. Find the corresponding configuration menu (the left box below) at:
Track -> Selfguide...


Give the Exposure time for the imaging CCD in that box. Give the exposure time for the tracking CCD in Track time. Note that the latter exposure time should be as short as possible (usually between 0.5 and 2 seconds, depending on the guide star) to allow the best tracking results, but still large enough for CCDOPS to keep track of the correct guide star. The Declination should be (approx.) the current declination of the field of view. In Image Size the resolution of the imaging CCD is given. The option Guide to can change the way of guiding:
Centroid allows tracking to the position of the guide star; Cursor allows tracking to the position of an specific pixel. Either the guide star (not necessarily the brightest star in the field of view) or a specific pixel to guide to must be chosen after clicking the OK button. Then click Resume to start the tracking. If the tracking is sufficient, one can start the exposure of the imaging CCD by clicking the Start button.

The above window gives statistical information on the tracking and allows to control it. Statistics depicts details on the shifts in X and Y direction (in pixels), the brightness integrated over the tracking box, and the rate of exposures taken by the tracking CCD. The further graphs contain details on the temporal change of the shifts in the X and Y direction. In the lower part one can follow the progress of the main exposure by the imaging CCD. In case, the guide star “leaves” the tracking box, the exposure is automatically stopped and all counts (until that moment) of the imaging CCD are read out.
Auto Guiding
The auto-guiding feature is very similar to the self guiding described above. With our equipment, auto guiding is only useful in two configurations. The first configurations is the STF-8300 in combination with the ST-i, where the telescope is guided by means of the ST-i, while the actual exposure of the investigated object is taken with the STF-8300. The second configurations is the ST-i in combination with one of the our spectrographs, where the telescope is again guided by the ST-i, ensuring that the object of interest is on the slit of the spectrograph during the entire integration time. After the start of the second CCDops session for the ST-i, the guiding process needs to be calibrated as described above. Subsequently, the auto-guiding feature can be activated via
Track -> Autoguiding...
The subsequent procedure is equivalent to the one described for the self guiding.
Self-Guiding with the AO-7
Both the ST-7 and ST-8 can be equipped with an adaptive optics module (AO-7), which has its own mirror and can be tipped and tilted. The AO-7 can correct for uncertainties of the tracking and, partly, remove the effects of the seeing. In contrast to the standard auto- or self guiding of the ST-7 or ST-8, the AO-7 allows faster corrections without relying on the mount's ability to track.
Setup
The Setup menu of the AO-7 can be found at:
AO -> Setup...

The options for Aggressiveness, Noise Filter, and the Log Tracking are equal to their counterparts in the standard guiding (see above, Calibration). The Slew rate allows an additional influence on the correction strength, besides the Aggressiveness. The default value of 500 should be sufficient for most observations. In case, the corrections are too strong, lower that value. In Relay threshold one can set the point when the mount is addressed to follow the guide star to keep it in the control range of the AO-7. If the option Adaptive Gain is active, the Aggressiveness is automatically readjusted. However, this option should only be activated by experienced observers.
Calibration
First, apply the calibration of the normal tracking, see above, so CCDOPS can correctly address the mount in case the tracking object might leave the control range of the AO-7. Afterwards, the calibration of the AO-7 can be started to maximally tilt the mirror unit of the AO-7 in all directions. Five exposures are then taken to determine the control range of the AO. Find the menu at:
AO -> Calibrate...
In the following window one can set the exposure time and the CCD to use. Additionally, one can activate the (debug) log. Furthermore, it is recommend to activate the option Calibrate from Corner as this gives better results.

The following image depicts the result of the calibration (very similar to the “normal guiding”), which in this case is (qualitatively) somewhere between the typical and optimal calibration result of the AO-7. In principle, the same criteria as described above for the “normal” guiding apply here.

Self Guiding
Once the calibration is done, open the Self-guiding menu:
AO -> Self Guide...
As before, Exposure time is the desired exposure time for the imaging CCD. The Track time is the exposure time for the tracking CCD that can be much shorter in comparison to the normal guiding, since the AO-7 can regulate much faster. The minimal Track time is 0.001 seconds, however, note that the integrated number of counts for the guide star should still be larger than 1000. In Track Box one can set the size of the tracking box around the guide star. Choose between Small (4×4 pixels), Medium (8×8 pixels), Large (16×16 pixels), and Huge (32×32 Pixel?). The smaller the box is, the better is the guiding result. But note that the guiding star can easily drop out of the (small) box if the seeing is bad. Since the seeing is quite often pretty bad at our site and the Large box is not available for our telescope, the most useful choice is Medium. The option Dither Exposure is only for debugging purposes and can be deactivated in most cases.

After clicking the OK button an exposure with the selected CCD is taken and shown along with the status menu (see the figure below). Select the guide star by moving the selection box on it and start the tracking process by clicking the Resume button.

This status menu presents some details, e.g. on the Guide Rate, which is the rate of corrections applied by the AO-7. Usually, the higher that value is, the better is the guiding. This can be reached by either by shorter exposure times or a smaller tracking box. The AO Position gives the deviation from the neutral position (50% x 50%) of the mirror. The RMS Wander is a measure for the efficiency of the guiding (smaller values are better), so try to reduce this value. Total Counts is the number of integrated counts of the tracking box (current and starting value). If Adaptive Gain has been activated in the setup menu, Adapt. Gain shows the applied amplification factor.
The option Fan On allows to turn off the fan of the CCD cooling device, in case its rotation excites vibrations in the telescope. However, this should not be a problem for our combination of camera, telescope, and mount. The option AO Enable can stop the guiding process of the AO-7 once the box is unchecked. Use the Slew Rate and Aggressiveness to optimize the guiding and to reduce the value of RMS Wander. First, adjust the Aggressiveness. If the guide star jumps or oscillates in the tracking box, reduce the Aggressiveness. In any case, keep an eye on the value of RMS Wander. Once the Aggressiveness is sufficiently adjusted, vary the Slew Rate, which limits the range of the AO-7's mirrors. It has proven helpful to first raise the Slew Rate until the value of the RMS Wander raises, then to slightly reduce it again. If the guide star is jumping in the box, it might also help to reduce the Slew Rate. Note, that large parts of the high velocity movements of the guide star can generally be ignored as they do not correlate with sequential exposures. Only variations to which this applies can be corrected by the guiding process.
Finally, once the result of guiding is sufficient, click the Start button to start the exposure with the imaging CCD.