Access to the laboratory computer
From December 2024, to access the data reduction computer via SSH, you must first log in via VPN. The ZIM explains how to set up the VPN. Unfortunately the instructions are only available in German. If you have any questions about the VPN, please contact ZIM directly.
There are two ways to analyse the data collected during the placement: 1. you can carry out the analysis directly on the computer called columba at our university by prior arrangement or 2. you can log on to this computer from your home computer and then carry out the data analysis from home.
External Login
The data can also be analysed remotely, both from the physics institute's computer pool and from a home computer with an internet connection. There are several ways of accessing the data, each with its own advantages and disadvantages. Credentials can be obtained from the supervisors or will be announced by email after the introduction:
 User:      alpha
 Password:  is given in the seminar
alpha is given here as an example and must be replaced by the corresponding group name.
Linux / Unix
Since the computers in the astrophysics are all operated with Linux, it's easy to log in from another computer with the same operating system. So you can do the complete evaluation from distance by logging in with a normal SSH connection on our laboratory computer. This also works for graphical output (i.e. view FITS files or text editors), but the performance crucially depends on the connection speed. In the computer pool at the university this is no problem but with a connection at home the speed may be low.
Login in the console with this command:
ssh -X alpha@columba.astro.physik.uni-potsdam.de
alpha is given here as an example and must be replaced by the corresponding group name. You will be asked for the password. The parameter -X (capital X) ensures that graphical output will be transferred so it can be displayed.
Alternative: Xpra
Alternatively you can log in with Xpra, which also communicates via SSH, but allows you to work with graphical output even with a poor internet connection. Xpra usually has to be installed from the package sources first. Once this is done, the following command establishes a connection to the laboratory computer
xpra seamless ssh:alpha@columba.astro.physik.uni-potsdam.de --start=konsole
The command is not very different from the one above, except that here the beginning and the end are slightly different. alpha has to be replaced by the group name here as well. If the connection has been established successfully, a Xpra icon or menu usually appears on the desktop (under Ubuntu it can be found in the upper right corner next to the network/volume/battery indicator). This menu can be used to configure Xpra as well as, via the menu item Start, to start programs directly on the laboratory computer. Xpra has the nice advantage that the windows integrate seamlessly into the local system.
Furthermore it offers the possibility to disconnect from the Xpra session without ending it by typing xpra detach in a Terminal. This allows you to interrupt the session at any point and continue it later. All that is needed is the following console command:
xpra attach ssh:alpha@columba.astro.physik.uni-potsdam.de
The Xpra session is terminated with:
xpra exit
Windows
PuTTY and Xming
Linux uses the X-Window-System to display graphical output while Windows has it's own system. That's the reason why graphical output from a Linux computer can not simply be displayed by Windows. To solve this you need to install an X-Window-Server designed to work with Windows. There are many options and programs that offer this functionality and we suggest these, slim freeware solutions:
Required programs
First install the server Xming, which optimally should be incorporated in the Windows autostart list. PuTTY is an executable that just requires a quick configuration:
- click on the menu item Session and enter
columba.astro.physik.uni-potsdam.dein the field Hostname - in Connection → SSH → X11 check
Enable X11 Forwardingto allow graphical output - in case of problems with the graphical output, enter
localhost:0in the field X display location in Connection → SSH → X11
MobaXterm
MobaXterm is a SSH client which already includes the X11 Server.
To increase the stability of the connection, it has proven useful to activate the “SSH keepalive” option and then restart MobaXterm.
Operating system independent
X2G0
In addition to the above mentioned possibilities, a X2Go server is also installed on the laboratory computer columba, which allows to work remotely and efficiently with graphical programs. The X2Go client is available for all major operating systems (Windows, Linux and MacOS).
After installing the client you can create a new session by clicking Session and then New session …. In the window that opens you have to define the session parameters.
These include session name, host, login, and the session type. The Session name can be freely chosen and is only used to distinguish between different sessions. As host columba.astro.physik.uni-potsdam.de must be specified. As Login the respective user name like e.g. alpha has to be entered.
The next step is to go to the Input/Output tab. Here you can enable Fullscreen and disable Set Display DPI to connect in full screen without pixelation. However, this may affect the speed of the connection.
After clicking on OK you can start the connection to columba by double clicking on the corresponding session entry in the main window of X2Go. Only the password for the respective account will be requested before the connection is established. The window that opens shows the MATE desktop, on which you can work as if you were sitting directly at the computer.
Attention Wayland users: Under Wayland, it is possible that the current client does not work properly and simply crashes when logging in, in this case it may help to start the client from the command line with
env QT_QPA_PLATFORM=xcb x2goclient
Logging in via Remote Desktop Protocol
This method is in beta stage
Unfortunately, this method is not working at the moment.
In addition to the methods described above, you can also log in to columba using the RDP protocol. The protocol developed by Microsoft is very performant and offers the possibility of displaying the entire desktop without any major loss of speed. There is a free implementation for Linux, so we can also use this with columba. However, since RDP is not considered the most secure method, you must first establish an SSH tunnel to columba before you can connect to the RDP server.
Under Linux, Remmina can be used for this, which can be installed in the vast majority of distributions via the package sources if it is not already supplied with the distribution.
Configuration instructions Linux:
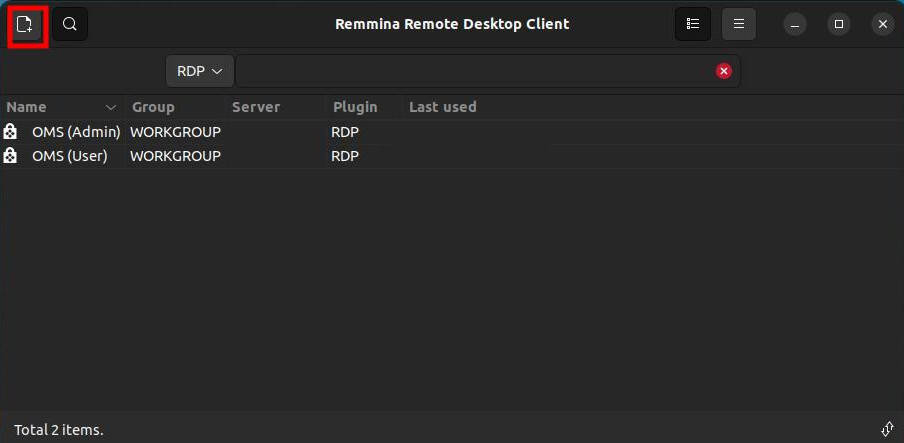
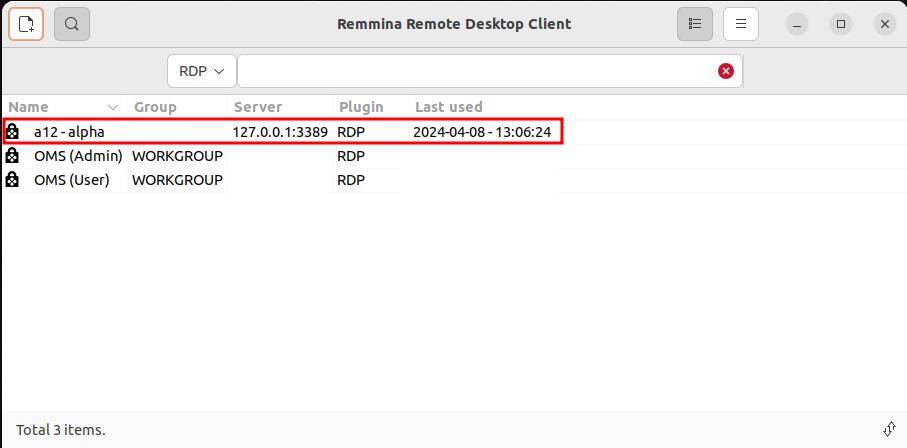
- After Remmina has been started, click on the plus symbol in the top left corner.
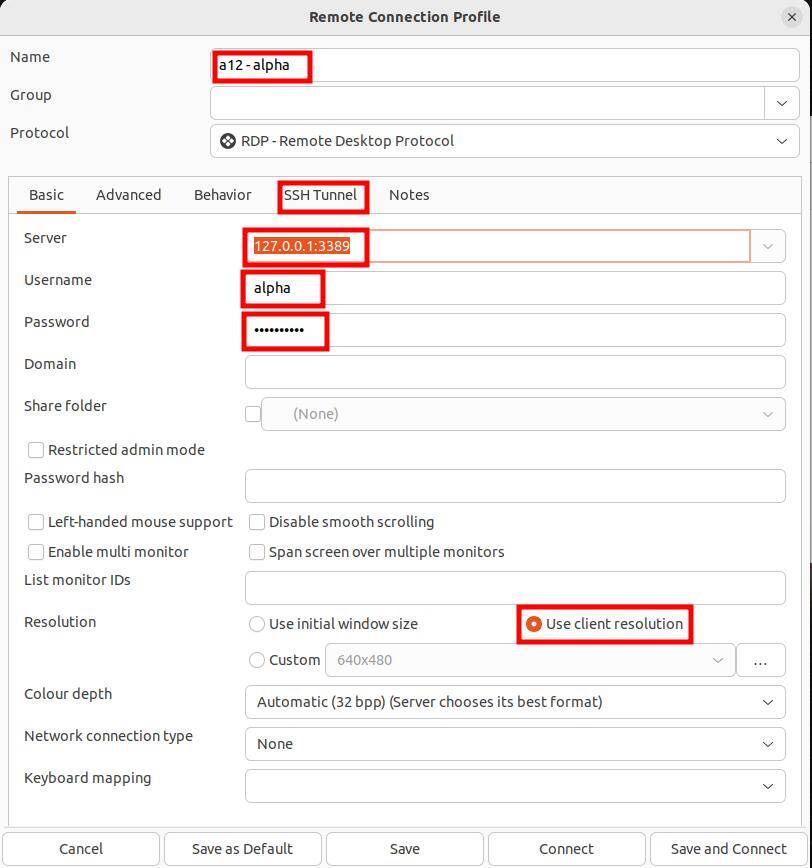
- This opens the configuration dialog
- Enter the following or activate the corresponding option:
- Name for the configuration
- Server address: 127.0.0.1:3389
- User name
- Password
Use client resolution
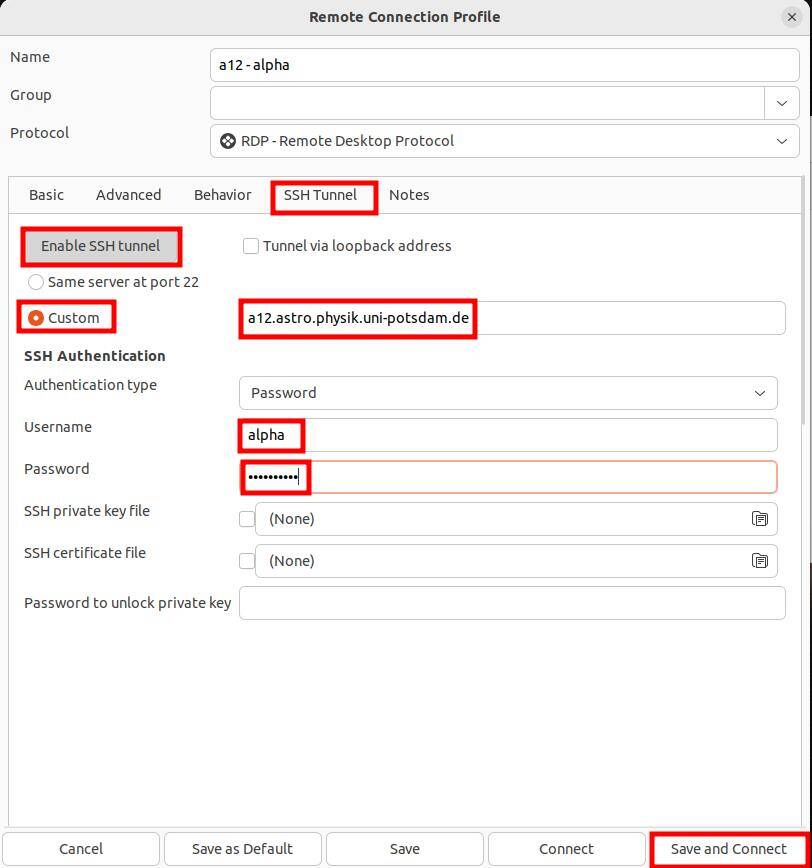
- Then click on
SSH Tunneland add the following configuration or enable the corresponding option:Enable SSH tunnel.Custom- Server address: columba.astro.physik.uni-potsdam.de
- Username
- Password
- Then finish the configuration by clicking on
Save and Connect. - Remmina will then connect to columba
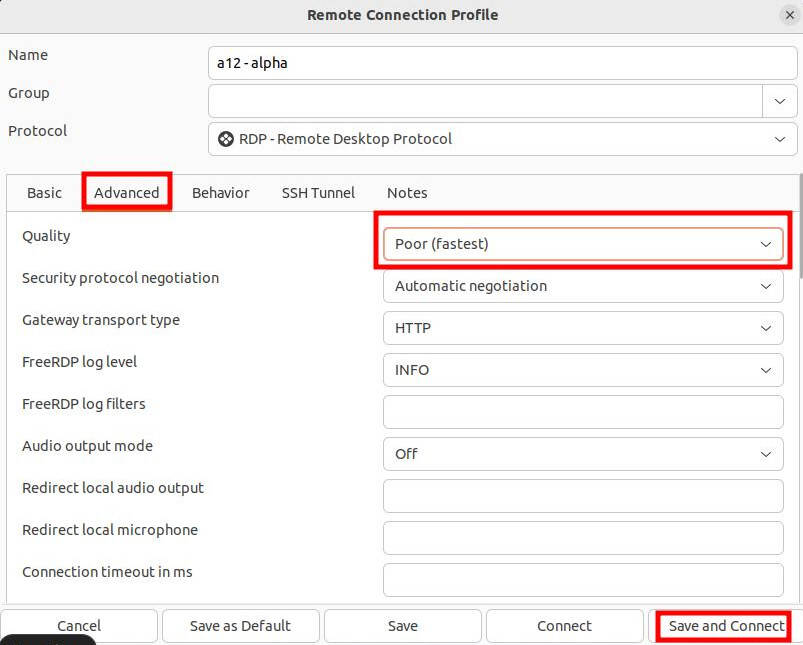
- If you are satisfied with the connection speed, you can increase the quality of the connection in the
Advancedtab. - After saving the configuration, you will find it under the name you entered in the list that Remmina displays when the program starts. Doubleclick on the entry to easily connect to the columba.
Configuration Instructions for Windows 11:
- On Windows, you must first set up the SSH tunnel before you can use the Windows RDP client because it does not provide this functionality itself.
- To do this, you must first open a PowerShell window.
- In this window, type the command
ssh -L 3399:127.0.0.1:3389 alpha@columba.astro.physik.uni-potsdam.de. Replacealphawith the appropriate group name.
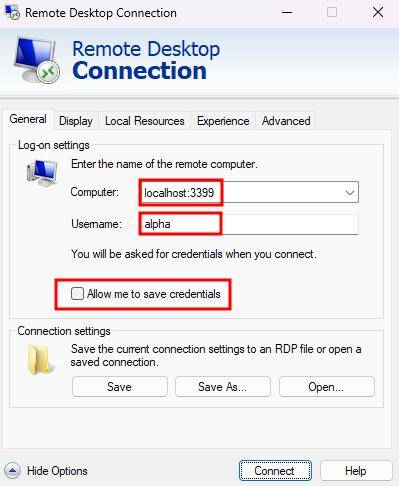
- You can then start the RDP client and enter the following configuration or enable the appropriate option:
- Computer:
localhost:3399 - User name
Allow me to save credentials(optional)
- It may be necessary to click on
Show Optionsfirst. - Click on
Connectto establish the connection. The password prompt will follow.
External Login from the computer pool in the Physics Institute
Also the Linux computers in the computer pool of the Physics Institute (room 2.28.1.101) can be used to login on the lab computer. See the description here: Linux. The computers share the fast internet access of the University and so the transfer rate, i.e. for graphical output it is sufficient to work. To get an account for the computer pool, ask Mr H. Todt (room 2.28.2.004).
Working directly on the data reduction computer
The computer for the laboratory courses shall be used for data reduction. It is in room 2.009 in the Institute in Golm and can be booked, i.e. request a timeslot by email.
These timeslots are already booked:
Linux Sheet Paper
This pdf file list the absolutely basic commands for a Linux console. The Bash Cheat Sheet contains some further commands.
Access to files by SFTP
Pure file transfer is possible, independent of the computer system, by logging in with SFTP (Secure File Transfer Protocol). All you need is a program that can run SFTP transfers, be it console based or graphical (i.e. WinSCP).
The login information are in principle the same as for the SSH client:
 Server:   columba.astro.physik.uni-potsdam.de
 Protocol: SFTP
 User:     alpha
 Password: as before
alpha is given here as an example and must be replaced by the corresponding group name.
Attention: In contrast to the login methods described in the previous sections, SFTP is just for file transfer. It will not let you work on data reduction or alike.


