This page is outdated and not longer valid. It will be removed soon.
OST operation
Security remarks
- NEVER look at the Sun with a telescope without a proper sun filter. This can lead to irreparable damage of your eyes and the optical instruments! The OST is not designed for observations of the Sun, so never point it to the Sun!
- WATCH THE CABLES! The user-friendliness of the telescope is based on a high automation of the components, which implies the need of some cables. To avoid getting caught in the cables connecting the telescope and the applied instruments, pay attention to them especially during rotations of the telescope.
- Always close the door to the roof because the hatch of the dome could collide with it, which could damaged both.
Entering the roof and dome
Details can be found here.
Preparations
Switch on the instruments
- switch on the power supply beneath the table (Line On to 1)
- switch on the power strip at the foot of the telescope's steel pillar
- remove the covers of the telescope and finderscope and place them on the roll container
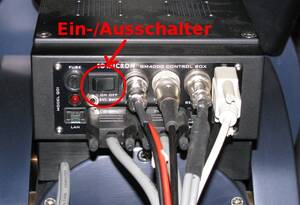
- press the On / Off button at the telescope's mounting and wait until the booting process is completed
Open the dome
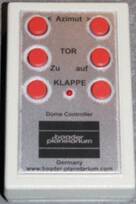
- use the dome remote control to first open the shutter
- as needed, open the horizontal hatch
Setting the time
For the correct calculation of the object positions, the telescope needs to know the current time. As the internal clock is often ahead of the actual time, it needs to be corrected before each observation.
To set the date and time, use the hand terminal:
MENU - Local Data - Clock - Date and Time
In the following screen one can set both (accurate to the whole seconds) with the numeric keys. It is useful to have a radio clock available or to use an Internet service, such as this one. Set a time approximately 30 seconds ahead of the current time and wait until the time set on the hand terminal is reached, then press ENTER to confirm.
Focusing
At the start:
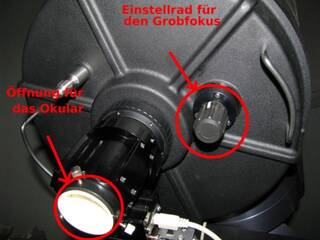
Remove the black back cover at the tube's end and plug in the eyepiece or camera.
The coarse focus:
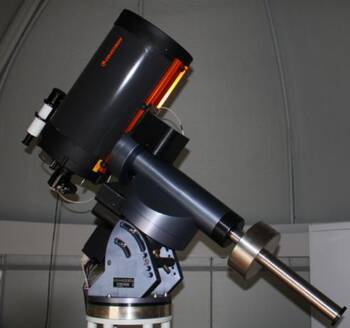
Of course objects will not be perfectly focused (in the eyepiece/on the screen) in the first try. For a coarse setting of the focus carefully turn at the focus knob, which is located at the same side of the tube as the eyepiece connector (see Figure on the right). At the end, turn the knob a bit counter-clockwise (this direction has a slightly higher resistance) to lock the mirror, minimizing its tilting during telescope movements.
A good focus for the ST-8 with the attached filter wheel can be reached after 20 counter-clockwise rotations of the focus knob from the right end.
The fine focus:
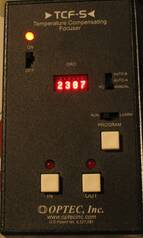
The device to adjust the fine focus is hanging down from the steel pillar (left Figure). Use the buttons IN and OUT to change the focus in the respective direction. Once the optimal focus has been found, activate the automatic temperature regulation that readjusts the focus based on the temperature change during an observation. To activate that automatic regulation, change the slider next to the screen to AUTO-A or AUTO-B (the latter has proven useful).
A detailed manual for the focusing can be found in this article.
Hand terminal
General
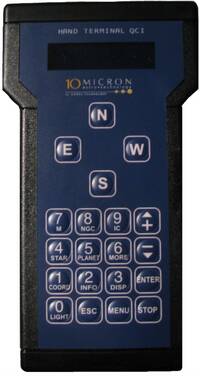
The most important function of the hand terminal is to move the telescope with the direction buttons
N - S - E - W
The N-S-buttons change the telescope's declination and the E-W-buttons change the right ascension. The speed of these changes can be altered by the buttons
+ and -
The current speed is shown on the display.
The hand terminal can be used to point the telescope to objects that were saved in the computer. Among those there are different astronomical catalogs, e.g. the Messier, NGC and IC, along with a list of stars and planets that can be reached by speed dial buttons on the hand terminal. For Messier catalog, e.g., can be chosen by pressing number 7. Afterwards, the specific object number must be given (e.g. 13 for M13) or use the “+”/“-” buttons to scroll through the catalog. Example: Messier Object 13:
7(M) - 13 - ENTER
After pressing the ENTER button some information on the chosen object will be displayed (type, brightness,…). The object needs to be confirmed by pressing ENTER once more. Afterwards, the telescope will move to the object.
Important commands
Setting the date and time:
MENU - Local Data - Clock - Date and Time
Move to or leave the parking position:
Park:
MENU - Alignment - Park
Unpark:
MENU - Alignment - Unpark
Dis-/Connect dome and telescope:
Disconnect:
MENU - Settings - Dome - Dome Control - No Dome
Connect:
MENU - Settings - Dome - Dome Control - Dome On GPS
Disable tracking:
MENU - Drive - Follow Obj. -> uncheck
Observation
Supported catalogs
Deepsky
- M - Messier
- NGC - New General Catalogue
- IC - Index Catalogue
- PGC - Principal Galaxy Catalogue (Complete up to 16m)
- UGC - Uppsala General Catalogue of galaxies
Star
- Name - Proper name of the star
- Bayer - Greek letter and constellation
- Flamsteed - Number and constellation
- BSC=HR - Bright Star Catalogue = Harvard Revised
- SAO - Smithsonian Astrophysical Observatory catalogue
- HIP - Hipparcos catalogue
- HD - Henry Draper catalogue
- PPM - Position and Proper Motions catalogue
- ADS - Aitken's Double Star catalogue
- GCVS - General Catalogue of Variable Stars
Observations with the eyepiece
There are eyepieces with different focal lengths. Start with an eyepiece of the largest focal length, then focus and use the direction buttons
N - S - E - W
to move the object to the center of the field of view, then change to the eyepiece with the next-lower focal length and refocus. After the observations, replace the eyepiece with the dust cover.
Observations with a CCD
After the observations
Parking the telescope
- First close the shutter and hatch of the dome. The hatch needs to be closed first. Afterwards the shutter can be moved down.
- The telescope must be returned to its parking position after the observations. Use the hand terminal:
MENU - Alignment - Park
- The telescope should then drive to a position where it points to the celestial pole. In this mode the tracking is disabled. If the parking position has been reached, there will be a beep-sound. Then switch off the telescope using the toggle switch On/Off (see figure in section Preparations). The internal computer will then be shut down, during that phase do NOT disconnect the telescope from the power supply (only disconnect after the small red LED next to the toggle switch is off).
Shutdown
- reattach the protective covers on the telescope and finderscope
- switch off the power strip at the foot of the steel pillar
- switch off the power supply (beneath the table, change “Line On” to 0)
- shutdown the computer
- switch off the light when leaving the dome
Problems and their solution
A collection of solutions for known problems can be found here.
