This is an old revision of the document!
Known problems, issues, and their solution
C14 and the GM 4000 mount:
Loss of the alignment
Description of the problem: The current alignment has been lost, e.g. by an incorrect operation (delete Alignment).
Solution: Restore a previously saved alignment. If such an alignment exists, it can be selected with:
MENU - Alignment - Align Database - Load Model
If there is no saved alignment, you will have to create a new alignment.
Problems with finding objects
Description of the problem: The telescope does not point to the selected objects or to wrong ones.
Solution: Possible solutions are in this order:
- check date and time (is DST set – only during summer) and the location in the settings of the hand terminal
- restore an old alignment (see above)
- create a new alignment (see here).
Problems with the tracking speed
Description of the problem: The tracking speed does not automatically adjust to the target, i.e. the moon.
Solution: By default, the following option should be enabled:
Menu - Drive - Follow Obj
If it is not, the automatic switching between different tracking modes does not work.
Problems with the park position
Description of the problem: The telescopes does not move to the default park position (pointing to the northern celestial pole).
Solution: The solution is to switch back to the default park position via:
Menu - Alignment - Park Position - Default park
Noise similar to a ship horn
Description of the problem: The telescope makes a loud noise similar to a ship horn when it is moved around the right ascension axes. The noise can be so loud that it is noticeable in the whole building. So far the problem only occurred at temperatures close to the freezing point.
Solution: So far, the problem only was solved by decoupling the right ascension motor from the right ascension axes and the subsequent reassembling. A detail description how to do that can be found in the manual to the mount, which is usually located in the office associated with our lab course. In case this procedure is not successful, one has to get into contact with Baader Planetarium.
Dome:
Dome wall vs. telescope I
Description of the problem: The dome's wall obscures the view of the telescope to the sky. This happens when the dome does not follow the pointing of the telescope, i.e. the open shutter is not in phase with the telescope.
Solution: There are magnets in the moving part of the dome and the dome wall, so that the dome control can register the current orientation of the dome. From time to time the dome must be recalibrated, which can be achieved by fully rotating the dome for one or better two rounds. To start that, first disconnect the dome and the telescope by means of the hand terminal:
MENU - Settings - Dome - Control - No Dome
Then the dome can be rotated with the dome remote control. Afterwards, the dome and telescope need to be reconnected again:
MENU - Settings - Dome - Control - Dome On GPS
Dome wall vs. telescope II
Description of the problem: The motor that drives the dome rotation can be heard but the dome does not rotate.
Solution: First, push in the red emergency button at the control unit next to the door (see this photo). Second, disconnect the dome from the telescope by means of the hand terminal:
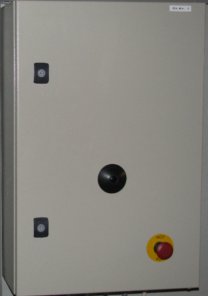
MENU - Settings - Dome - Control - No Dome
Now pull out the emergency button again. Try to move the dome with the help of the remote control. Alternately press the azimuth buttons until the dome freely rotates again. Afterwards, reconnect the dome and the telescope:
MENU - Settings - Dome - Control - Dome On GPS
Shutter vs. hatch I
Description of the problem: The shutter of the dome does not close completely and a small gap remains between the shutter and the hatch.
Solution: Open the shutter until it is possible to move the hatch. Open the hatch a bit and close it again. Afterwards, it should be possible to completely close the shutter.
Shutter vs. hatch II
Description of the problem: The shutter or the hatch do not close via the remote control.
Solution: One can use the following command on the hand terminal to completely close the dome:
MENU - Settings - Dome - Close Shutter
Afterwards, it should be possible to move the shutter and the hatch again via the remote control.
C11 and the CGE-Pro mount:
No Response-Errors
Description of the problem: The hand terminal shows the error message No Response 16 or No Response 17.
Solution: These error codes appear in case the communication between control unit and engines of the right ascension axis and/or declination axis is disturbed. First, check if all cables are correctly plugged in. If that didn't solve the problem, use contact spray on the connectors of the plugs (attention: Do not directly spray into the sockets). If the problem persists, the hand terminal is probably broken.
Loose bolts at the electronic box of the CGE-Pro
Description of the problem: The sockets for the right ascension and the declination cable of the electronic box are loose and it is not possible to tighten them.
Solution: The bolts that hold the sockets are countered from inside the box by means of nuts. Therefore, it is inevitable to open the box. The cover of the box is bolted into the upper part of it. Since the cover is plain with the exception of a few boreholes, it could be a bit troublesome to remove it. One can try to turn the cover by means of a screwdriver but one has to be very careful in order not to damage the electronics. However, the best option is to build a special tool for this purpose. In each case a certain amount of strain is necessary to open the electronic box. Therefore, it probably is a good idea to get some help, so that somebody or something can hold the box while turning the cover. When the box is open, the bolts of the sockets can be easily tightened. Subsequently, the electronic box can be closed again. It is important to carefully tighten the cover. Otherwise, it might be not possible to attach the mechanics to the electronic box when the mount is set up.
C9 and the advanced GT mount:
Telescope pointing
Description of the problem: Instead of driving towards objects correctly and precise, the telescope points to the ground. Furthermore, the movements of the telescope (along larger distances) are (very) slow.
Solution: It's likely that the power supply is causing the problem. Try a different power supply.
Cameras:
Ice on the camera

Description of the problem: The CCD chip of the camera has experienced icing, see image on the right.
Solution: The cameras' interior is not in a vacuum and moisture can get in, causing icing on the cooled CCD chip. To prevent this, the cameras have dry cartouches with desiccants. If icing appears, the cartouches need to be regenerated (see this article). During that observational night, wait for approximately one hour until the ice sublimates from the CCD chip.
ST-8: shutter error
Description of the problem:
CCDops reports shutter error while taking the first images after switching on the camera.
Solution: In this case the communication between the camera and CCDops is disturbed or the sensors for the shutter position do not work properly. Therefore, the software does not know whether the shutter is closed or not. It also could be that the shutter is indeed not moving as expected. In each case, it is often sufficient to switch off the camera and to disconnect it from the power supply. However, sometimes it is necessary to detach the camera from the telescope and to very carefully shake the camera a bit. Afterwards, the sensors of the shutter usually deliver proper data again.
Manuals
Current user's manuals are in the laboratory course room (2.009):
| Manual | Comment |
|---|---|
| 10Micron GM 4000 QCI mount | Blue folder |
| 10Micron GM 2000 QCI mount | Folder (mount not available) |
| Celestial Globe | Folder |
| VNC | Folder |
| T-Point | Software hand book |
| PC-Control of the mounting GM 2000 | Folder, for “Perseus”, “The Sky”, and “Cartes du Ciel” |
| SBIG Users Guide: CCDOps | Ring bond, for CCDOps Version 5 |
| SBIG Operating Manual CCD Cameras | Ring bond, for ST-7XE, ST-8XE, ST-9XE, ST-10XE, ST-10XME, and ST-2000XM |
| SBIG CCD-Camera manual (german) | Folder, Baader, for cameras and control/data reduction software |
| SBIG AO-7 Manual (1997) | Loose paper collection, Manual for adaptive optics |
| SBIG AO-7 Manual (2003) | Loose paper collection, Manual for adaptive optics |
| Manual for automatic observation domes | Folder, from Baader |
| TCF-S Manual | Folder, (printed from CD?) manual for focusing |
| Visual Spec Manual | Folder, data reduction software for spectra (Windows) |
| DADOS Manual | Folder for the spectrograph |
| Celestron Advanced Series GT Manual | Manual for the mobile telescope |
| Folder with various short manuals | e.g. Micro-Guiding-Crosshair-Ocular, USB-equipment |
| Panasonic Toughbook CF-31 | Manual |
Known problems that we are working on
Tracking error
The following image illustrates the telescope's tracking problem. On the left panels, you can see the globular cluster M 13. The lower left panel shows an exposure of 10s, which gives a fair result. The upper left panel combines 135 exposures of each 10s, so approx. 35 minutes in total. The stars are clearly smeared and describe a fine zig-zag line (length of about 1/2').
The right panels show the exposures of an open cluster of 30s exposure time. Again, the lower right panel shows one exposure, the upper right the combinations of all following exposures.
Note: The exposures were taken with the ST-8 and are not fully reduced here.
